Thursday, September 17, 2009

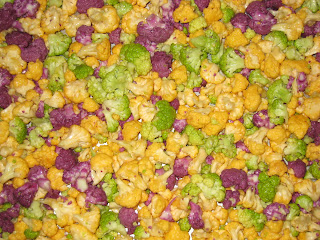
Roasted Cauliflower


Cauliflower originated in Cyprus and was introduced to France from Italy in the middle of the 16th Century. Louis XIV's mistress, the Comtesse DuBarry, asked the king's chef to make it so much that he named all the dishes with cauliflower in it after her. Whenever you see "DuBarry" in the title of a french dish, you know which vegetable is the primary ingredient. It can be colorful, fractal (as the Romanesco, and always delicious. It also doesn't need anything fancy. I roast cauliflower at least once a week. Olive oil, salt and 2 pinches of curry. I have to roast it until the tiniest florets are brown and crispy. Its just that much tastier. The cauliflower will reduce in size by about half when you roast it hard. Which means if you like picking while you're cooking, the amount you end up with could be a lot less.

2 Heads of Cauliflower
Olive Oil
2 Tspn Salt
2 big pinches of curry (substitute lemon if you don't like curry)

1. Preheat oven to 450F
2. Pick apart the florets into small pieces and place in a large mixing bowl. Add enough olive oil to coat the florets, salt and curry.
3. Line a cookie sheet with parchment paper and place the florets on it.
4. Roast for 25 minutes. Rotate the cookie sheet and roast for another 5-10 minutes depending on how brown the florets are.

Tuesday, August 11, 2009

Pan-Seared Red Snapper with a Roasted Corn Succotash


“Succotash” comes from the Native American word “msikwatash” or “msickquatash”, which means "broken into bits" or "boiled corn kernels" and can refer to any cooked mix of vegetables with corn and beans in it. ‘Tis the season for fresh, local produce so be creative with your vegetable blends. The tart bite of arugula and the acid from the roasted red peppers soaked in vinegar add texture and depth of flavor to the roasted corn. Smoked Paprika is one of my favorite flavors; smoky, like bacon. This dish took a total of 30 minutes from start to finish.

2 pcs of Striped Bass Filets

4 Cobs of corn
2 Roasted Red Peppers
1 ½ Cups of Arugula
2 Tbls of Greek Yogurt
2 Tbls of Olive oil
2 pinches of Smoked Paprika
Salt & White Pepper

1. Husk all 4 cobs of corn. Boil two for 3-4 minutes.
2. Preheat the oven to 400F. Shave off the kernels of the other two cobs with a chefs knife in a vertical motion. Place the shaved kernels in a large mixing bowl. Add smoked paprika and olive oil. Mix together and spread out evenly in a roasting pan. Cook until the kernels start to brown – 10 minutes approximately.
3. Dice up the roasted red pepper and arugula. Set aside in a mixing bowl.
4. Shave off the kernels of the cooked corn and place in a food processor. Add yogurt and ¼ cup of water. Puree.
5. Combine corn puree, roasted kernels and yogurt into the red pepper/arugula mixture. Stir and season with salt and pepper to taste. Add more paprika here if you like a strong smoky flavor.
6. The hard part is over. Just pan sear the fish. A crispy skin is always delicious and a great textural addition. Coat the fish with some vegetable oil, salt and pepper. Heat a skillet with some oil until the oil begins to ripple. Sear skin side down for 6 minutes depending on the thickness of the filet. Flip and sear for a 1-2 minutes. Plate.

Almond Encrusted Banana Corn Flake Cakes with Homemade Caramel and Vanilla Ice Cream


I do not put many desserts on this website. I try, like the rest of the country not to eat many sweets. I had to come up with a dessert that worked quickly and was cooked on a grill. I cheated on the grill part (skillet on the grill) but this is one of the most delicious desserts I’ve ever tasted. The majority of the people at the cook-off thought so too. I am sorry there is no picture. The cakes are pan-seared and hot so the ice-cream melted before I could take a good picture. These are pretty simple to make. I used store-bought Haagen-Daazs Vanilla; sometimes time and travel requirements just don’t allow you to make homemade ice cream. The Corn Flakes act as a thickening/binding agent to the bananas. The Corn Flakes were an improvisation, I originally wanted to use Almond Flour but its hard to find it at the average grocery. I feel like Corn Flakes is enjoying a Renaissance because of David Chang’s pastry chef, Christina Tosi. The trickle down effect is amazing; I see cornflakes at least once in every food magazine lately. SO here is one more to add to the tasty expanding pool. These banana cakes are a summer time treat not to be missed.

2 Bananas
2 Cups of Corn Flakes
1 ½ Cup Slivered Almonds
Olive Oil

1 cup of Sugar
½ cup of Cream
3 Tbls of Unsalted Butter

Vanilla Ice Cream

1. Add the bananas and corn flakes into a food processor. Puree. Roll into palm size balls. Place in the freezer for 10-15 minutes.
2. Toast the slivered almonds, in a skillet, until golden brown. Set Aside.
3. Make the caramel. Pour the sugar into a skillet that is being heated on high. When the sugar starts to brown around the edges of the skillet, stir the sugar with a wooden spoon. Let the sugar brown a bit more evenly then slowly add in two tablespoons of cream and 1 tbls of butter. Stir vigorously. When the butter and cream are incorporated add the remaining amounts and stir. Keep warm.
4. Add vegetable oil to a large skillet and place over med-high heat.
5. In a mixing bowl add olive oil, banana balls and toasted almonds. Coat the banana cakes with the almonds. Place in the skillet, flatten into patties and brown on each side for about 4-5 minutes.
6. Plate: Drizzle the caramel on the plate in whatever fancy design comes to you. Plate the cake and add a dollop of ice cream to the top.

Thursday, July 2, 2009

Cocktails for the Summer


These drinks were featured in the Summer 2009 issue of 'Elegant Bride.' The Jewel of the CondeNast bridal group.


“Remembrance”

Canton Ginger Spirit – 1 oz
Blood Orange Juice - 2 ozs
Rosemary Simple Syrup – ½ Tspn
Triple 8 Vodka – 1 oz
½ Lemon – juiced
Splash Club Soda


1. Rosemary simple syrup: add equal parts sugar to water. Dice up a long sprig of rosemary into ultra fine pieces. Add everything to a pan and heat up until all the sugar has dissolved. Let infuse for 5 minutes. Strain through a fine-mesh sieve and reserve.
2. In a martini shaker combine all the ingredients, except club soda and shake. Pour into a martini glass and add club soda.

Garnish: Rosemary sprigs OR red sanding sugar

“Lavender Sweetheart”

Lavender Tea – 2 ozs
Beefeater Gin – 1 oz
St Germain – 1oz
Lime Zest
½ Lime – Juiced

1. Bring 4 ounces of water to a boil and infuse with 1 Tbsp. of lavender. Steep for 5 minutes, then strain. Let cool.
2. Zest half a lime and reserve.
3. Add all the ingredients except the zest into a highball glass, stir.
4. Sprinkle zest on top

Garnish: Oversize or Regular Lavender Ice cubes OR Lime Pinwheel

“French Cuffs”

6 Ozs.Champagne
½ Oz.Aperol
½ Oz. Elderberry

1. Pour Champagne into fluted glass.
2. Pour the elderberry over the bottom of a soup spoon slowly into the champagne. This will create the layers for the desired look.
3. Pour the Aperol over the spoon slowly.

Eyrie Vineyards


Eyrie Pinot Blanc, 2006
$20 or Under
Willamette Valley, Dundee Hills, Oregon

A Brief Introduction to Eyrie Vineyards
If you love Oregon Pinot’s then you need to know where the story began, with David & Diana Lett. Eyrie (Eye-ree) is an iconic American vineyard. David Lett or ‘Papa Pinot’ was the first person to plant Pinot Noir and Chardonnay in the Willamette Valley of Oregon. He was the first to plant Pinot Gris in America. Eyrie’s 1975 Pinot Noir competed in the Paris and Beaune wine competitions and beat out the French Burgundies. Can you say ‘Upset’? Thanks to Ms. Wasserman who slipped David’s Pinot’s into the tasting panels, Oregon gained International acclaim as a place to grow Pinot Noir in the New World (I think only the Europeans still use this term to describe America).

So after the history lesson you should taste their wines. These should be easy to find, although not as prevalent as a Pinot like Erath, Eyrie’s wines are still very small production (15,000 cases total in 2007). The Pinot Blanc case production is 700 cases and in the words of Food & Wine “Eyrie doesn’t make a lot of pinot blanc, so buy it when you find it, and indulge in its lean, intense mineral and light pear flavors”

The wine undergoes malolactic fermentation in stainless steel which gives the wine a full and round sensation in the mouth plus tasty citrus profiles. It’s a medium to full bodied white with tangerine peel and sour apple flavors. 2006 was an excellent vintage. Drink up!

Pair with Oysters, Cheeses, Fish…the Summer

Saturday, June 20, 2009

Wines?


So I have been working with a wine importing & distribution company since November '08. I am always tasting wines from the portfolio and have decided to include a few of the wines on this blog. After all, I am sure many of you enjoy wine with your food and if you don't, you need to start. They are excellent compliments to each other.

Some wines will be from the portfolio I work with, others will not be. All of the wines reviewed here will be from family owned properties. Usually the wineries will be boutique operations with a small case production emphasizing a hand crafted sustainable approach to wine making.

Raw Power Shiraz 2006
$15 or Under
Adelaide Plains, Australia

Falling just short of sniffing gunpowder and shooting up EPI pens there is ‘Raw Power Shiraz.’ A palate and marketing punch in the face, this wine screams at the anti-authoritarian crowd. The bottle adorns ‘Exploited’-esque skulls and safety pins on the label plus a totally punk rock importing story; that I cannot share in a public forum. Let’s just say the story on the back of the bottle is more ‘Spinal Tap’ than ‘Sex Pistols.’

This is an intense wine with fruit forward characteristics. The oak is well integrated on the palate. For a wine that boasts “Raw Power” it is not an oak bomb. The ‘Power’ is really in this wines longevity and resistance to deterioration after oxygen has been introduced, i.e. after being opened. You could pop this bottle and leave it open for 4 days and it would still be delicious on the 4th day. The oxygen aids in the evolution of the flavors.

Pair with pizza, curries, mexican food...cuisines with gutsy flavors

Taft Street Russian River Valley Riesling, 2008
$18 or Under
Russian River, California

Let’s start by saying that the Russian River Valley is the premiere area for growing grapes in this country. The fruit is consistently dazzling. Enter Taft Street who has been around for over 30 years. They went from being a mass-producer of wine then pulled in the reigns, dramatically. They produced 57,000 cases, now down to 15,000. What does this mean? It means a return to the heart & soul of the operation; crafting elegant, well-structured wines with more of a personal touch thanks to winemaker Evelyn White.

These guys focus on Pinot Noir & Chardonnay and there selections of these varietals are outstanding. I picked the Riesling to write about because it has a fun story attached to it. One of the grape farmers that Taft Street buys from called up Evelyn and said “Hey I have 7 extra tons of Riesling do you want it?” She of course jumped at the opportunity and made a fantastic wine. With the Russian River mostly devoted to Chard & Pinot Noir, Riesling is small production and always limited. There were only 380 cases made; which means a bit harder to find but worth it. Taft Street, after the great success of this Riesling will continue to make more in the upcoming vintages.

This Riesling shows an excellent balance of off-dry characteristics with a rich mouth feel. There is no malolactic fermentation; Russian River fruit doesn’t need it. The minerality is minimal but there and in harmony. This wine should be exactly what you expect from a Riesling, a little sweet, structured with layers of flavor and the perfect amount of acid.

Pair with white fish dishes, shellfish, cured meats and cheeses, fondues

Thursday, June 18, 2009

Hijiki


More Calcium than a glass of milk!
More Iron than an egg!
A super antioxidant!

Its not pomegranate, not a maitake (though these are arguably one of the most potent super foods out there)

Its Hijiki; a type of seaweed or sea vegetable. You can find it at most sushi restaurants. Its served in a little dish or bowl and great to pick at. In NYC there are a few Japanese markets that sell it. The one I usually go to is Katagiri on 59th between 2nd & 3rd. Arame is another sea veggie that is a bit milder than Hijiki and can be used alternatively for the following recipe. This makes a great summer dish for its refreshing and chilled qualities.

1/2 Cup of Hijiki
1 small bulb of Ginger, skinned and diced fine
1/2 Tbls of Sesame oil
1/2 Tbls Tamari Soy Sauce
1/2 Tbls Mirin
Red Pepper Flakes
1 Tspn Sugar in the Raw
2 Tbls Toasted Pine Nuts*
1 Tspn White Sesame Seeds

1. Soak the hijiki for 15-20 minutes in cold water. They will swell to 2x their original volume.
2. While the hijiki is soaking. Peel and dice the ginger and toast the pine nuts.
3. Heat up the Soy Sauce, Ginger, Sesame Oil, Mirin, Pepper Flakes. Add sugar and reduce.
4. Strain and press the Hijiki. Add to the ginger/soy mixture. Stir. Add the pine nuts and place in a bowl.
5. Chill for a few minutes.
Done.

*Toasted Pine Nuts are expensive. Sub anything you want here that adds color and texture; Green or Red Bell Peppers, Carrots, Radishes...you get the idea.

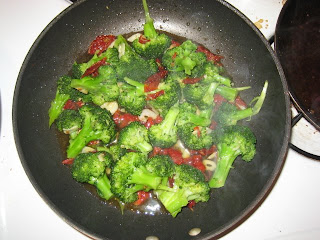
Sauteed Broccoli with Garlic & Sundired Tomatoes


If I were to go ‘Vegetarian’ this dish would be a staple of my diet. When I cook this dish its hard for me not to eat the whole head of broccoli. The flavors are robust, its healthy and soooo easy to make. It serves as a side dish to steak, chicken, fish, or on its own.

1 Head of Broccoli, florets broken off the stalk**
½ Cup Sundried Tomatoes
2 Cloves of Garlic, thinly sliced (more if you love garlic)
Adobo
Extra Virgin Olive Oil

1. Bring a pot of water to a boil.
2. Rehydrate the tomatoes for 5-10 minutes
3. In a skillet, over medium heat, sauté the sliced garlic. Saute for 2 minutes. If you notice the edges around the garlic getting brown lower the heat.
4. Chop up the sundried tomatoes and sauté with the garlic
5. Cook the broccoli for 1 ½ - 2 minutes. Strain and toss in with the garlic and sundried. Add some of the sundried tomatoe water (optional) and dust the broccoli with the adobo.
6. Dump contents into a serving bowl and stir to make sure the juices are dispersed. Taste and adjust.

**Those naked broccoli stalks...all the florets gone. DON'T THROW THEM OUT. They still contain nutrients. Make a pesto with them, slice them and pickle them, puree them with peanuts, cilantro, soy sauce and make a spread or dip. Just don't waste food ehh.

Wednesday, April 1, 2009

Pan-Seared Salmon with a Mirin-Dijon Sauce and Chorizo Brussel Sprouts


Damn I cannot get enough of this sauce. Its like that ginger dressing at sushi joints, I could just drink it and slurp it down with anything…even shoes.

1 Lbs. Salmon, sliced in two pieces
Vegetable Oil

½ Lbs Brussel Sprouts
½ Cup Chorizo, sliced and quartered
¼ Cup Dry White Wine
Black Pepper

1 large Tbls Dijon Mustard
2 Tbls Tamari (High Quality Soy Sauce)
½ Cup Mirin
1 Rstd Red Pepper, diced
3 Cloves Garlic, minced
1 Shallot, minced

Procedure:
Brussel Sprouts:
1. Bring a pot of water to a boil. Cook the brussel sprouts for 3 minutes and strain.
2. In a sauté pan, drizzle some vegetable oil and put the flame up to high. Add the diced chorizo and sauté until crisp. Deglaze with the white wine and add the brussel sprouts. Coat well. Turn off the heat and set aside.
Sauce:
1. In a sauté pan add 2 tbls vegetable oil, shallots, garlic and red peppers. Put the flame on medium and stir with a wooden spoon until the shallots start to brown.
2. Add Mirin, Tamari and Dijon mustard. Whisk together and cook for one minute. Set aside and keep warm.
Salmon:
1. In a sauté pan add 2 tbls of vegetable oil. Put the flame up to high and wait until the oil starts to ripple. Add salt and pepper to both sides of the fish and place in the pan. If the oil does not sizzle when you add the fish, the oil is not hot enough.
2. Pan sear the fish on one side for 4 minutes. The skin should be a beautiful, crispy brown, if its not, sear for another 1-2 minutes.
3. Flip the fish and sear for another 1-2 minutes. At this point it should be medium depending on the thickness of the fish. **
To Finish:
1. Reheat the brussel sprouts and sauce while the salmon is cooking. Place the fish on a paper towel lined plate first to absorb any excess oil. Put the fish on the plate, drizzle the sauce on and plate the brussel sprouts.

**I had a very thick cut of Salmon. If the fish you find is thin, then adjust your cooking times accordingly. For thin slices it will take only 2 minutes one each side to bring to mid-rare.

Friday, March 6, 2009

Homemade Orecchiette with an Onion Sherry Sauce & Herbs


*So I saved this image 4 times with 4 different rotations. No matter how I saved the file, it would not upload the photo properly. It always put the rosemary sprig to the right. Never facing up. Very odd. So that's why the pic is a little cockamamie.**

This dish is my paean to the Onion. Onions are one of the most obvious and available vegetables around. Cheap too. Usually they are used as the starting point for sauces or an addition to a marinade or the supporting role in a mirepoix. I discovered the magic of slow-cooked onions one Christmas when I decided I was going to make French Onion Soup. I dug through a slew of recipes and decided to meld 2 of them. One recipe called for cooking just the onions and butter for an hour. It was an old cookbook and had never thought to cook an onion for that long but I gave it a try. After 45 minutes of watching these onions go from eye-tearing white to a luscious caramel color I was hooked. They become so sweet and that raw intense onion flavor becomes nuanced. Cook onions this way and you will never forget the taste.

Orecchiette was the first pasta I ever made by hand. It was pretty rustic looking but fun to make and the name always struck me: “little ears”. Bill Buford writes about this pasta in “Heat” when he was chronicling the adventures at Mario Batali’s Babbo and I know it has a much more storied past than that. Mixing the dough, rolling it into ‘ropes’ and making the orecchiette only took about 45 minutes and I made this work with the recipe because the onions take a long low and slow cooking.
You don’t need any fancy machines or tools for this pasta which is another reason I like it so much. Plus, the ‘little ears’ cradle the perfect amount of sauce.


Orecchiette

½ Cup warm water
¾ Teaspoon Sea Salt
1 ¼ Cups Semolina Flour
1. Stir together water and sea salt in a bowl until salt has dissolved. 2. Form a well with the semolina and slowly add the water. Incorporate the water with the flour using a fork. Add more water as needed. Once all the water is included you should have an elastic dough ready to knead. 3. Cut half the dough and roll it into 2 ropes. Slice these into quarter-inch thick pieces. 4. Flour your hands and press your thumb down into the center of the pasta. Make one circular rotation pressing lightly on the pasta. That should be enough to form a ‘little ear.’ If you are difficulty on a counter top, place the pasta in the palm of your hand and use your other hand to shape. Continue until all your pasta is made.

Onion Sherry Sauce

2 Onions
3 Tbls Butter
½ Cup Sherry
¼ Cup Chx Broth
1 Tspn chopped, fresh Thyme
1 Small Sprig of Rosemary, chopped fine
Salt & White pepper*

1. Halve the onion then slice it in long, thin strands.
2. Add to a large skillet with the butter. Put the flame on low. Cover for fifteen minutes. Uncover and continue to cook for 25 minutes on low heat. The onions should be soft and browning.
3. While the onions are cooking, in a separate pot pour in all the liquid and reduce by half. Add a bay leaf if you like.
4. Add the thyme and rosemary to the onions along with a few pinches of salt and pepper. Add half the sherry/broth mixture. Stir. Let the liquid reduce slightly and add the rest of the mixture.

Finish
1. Bring salted water to a boil. Add orecchiette. Cook until al dente. This usually takes about 4-5 minutes because of the hard semolina flour. Taste one before you strain.
2. Once strained add the orecchiette to the Onion Sherry sauce. Coat well and serve. Sprinkle with some extra diced herbs

Salamagundi or Pirate Stew


I have an obsession with pirates. So when I was down in Key West recently, and had the chance to visit Pat Croce’s Pirate Museum, I jumped all over it. For anyone remotely interested in pirates this is the spot. They house the only pirate treasure chest that was filled with treasure in salvaged existence. They also have one of two pirate flags known to exist in the world.


The Museum also has a recipe for ‘Salamagundi’; the last meal ‘Black Bart’ Roberts ate the day he was fatally shot in battle against the British Royal Navy and a common dish aboard a pirate ship.


As you may have guessed “cuisine” on any sea faring ship was not gourmet. However, this dish is similar to Beef Burgundy in the sense that it’s a long braise with a wine-centric marinade and vegetables. Its also a perfect winter stew.
The original recipe I found calls for turtle, fish, chicken, pig, cow, duck and pigeon. The marinade consists of spiced wine, herbs, palm hearts, garlic and oil and is to be accompanied with hard-boiled eggs, anchovies, pickled onions, cabbage, grapes and olives.
Unless your on Grand Cayman, you cannot eat turtle meat. Everything else is pretty easy to find, for “pigeon” use squab. I didn’t but you can.
Just a heads up, this dish from start to finish takes 4 hours.

1lbs “Beef for Stew” aka brisket or rump
2 Duck Legs (Save the breast meat for another use)
3 Chicken Thighs
¼ Lbs Codfish Cheeks*
Vegetable oil
1 Onion, chopped
1 Cup each of chopped Carrots & Celery
6 Radishes, cubed in half or quarters
5 Cloves of Garlic, minced
1 Tbls Clove
5 Sprigs of Thyme
1 Sprig Rosemary
1 Tbls Peppercorns
1 Bottle of Red cooking wine
1 Quart Beef Stock
1 Cup Chx Broth
½ Can of Hearts of Palm
1 Tspn Cinnamon

Accompaniments: Crusty bread for soaking up the stew

That’s a laundary list of ingredients. Ready, set, GO:
1. In a 4-5 gallon pot brown all the meat (chicken and duck first then the beef). If you start to notice the bottom getting dark brown lower the heat.
2. Take out all the meat and reserve. Throw in all the chopped fresh veggies; onion, celerey, carrots, diced radishes. Brown in the same oil that you just browned all the meat in. Add more oil if needed. Cook the veggies for 5 minutes on med-low heat. Deglaze the bottom of the pot with 1 cup of beef stock. Scrape up all that browned goodness on the bottom of the pan with a rubber spatula or wooden spoon.
3. Add all the meat back into the pan except for the chicken. Add the chicken in the last hour of cooking. I will remind you again.
4. Make a boquet garni with cheese cloth: add the clove, thyme, rosemary, peppercorn. Drop it into the pan. Also, add the 1 tspn of cinnamon
5. Pour in all the remaining broth, stock and wine. Make sure all the meat is covered by the liquid. If it’s not add more wine or stock to cover.
6. Braise for 2 hours on low heat. There should be the slightest of simmers going on in that pot. After the 2 hours add the chicken and hearts of palm. Cook for 45 more minutes then add the cheeks/fish. Cook for 15 more minutes and serve with a crusty piece of bread for soaking up all that good stew.

This should yield about 3 quarts of stew. Freeze some and eat the rest.

*Codfish cheeks are hard to find. I had frozen them from a time when I was going to make a bouilliabase. I ended up not making that when I was supposed to and had these leftover codfish cheeks. The cheeks cook in less than 2 minutes and are very mild. If you can’t find the cheeks use a very mild-tasting fish; halibut, mahi-mahi